Faucet Repair

How to Do Your Own Faucet Repair

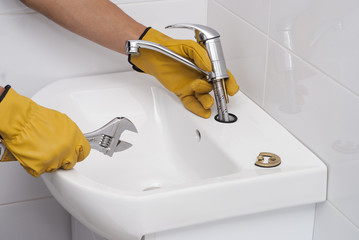
Before attempting faucet repair, turn off the water supply to the fixture. You may lose small parts or cause a leak if the water is still running.Faucet Repair

Start by removing the aerator (if there is one). Then, remove the handle(s) and decorative part of the escutcheon. Next, unscrew the disk cylinder mounting screws. For professional help, contact Plumbing Express, Inc. now.

Many homeowners are able to fix leaky faucets themselves with only basic tools. It’s important to learn about the different types of faucets (ball, cartridge, and ceramic disk) as each type may have its own unique set of problems. In addition, it’s important to understand what causes a leaky faucet so that you can troubleshoot the problem and identify the appropriate solution.

For example, a leaking faucet with a ball or cartridge head can usually be fixed by tightening the adjusting ring or packing nut, which holds the valve seat or stem in place. In some cases, this can be as simple as a few turns with a wrench, but it’s also possible that the nut needs to be removed completely and replaced.

Another common cause of a leaking faucet is worn out or damaged O-rings. These rubber seals are located under the spout and create a water-tight seal, but over time they can become worn out or cracked, which allows water to seep through. You can usually find replacement O-rings at a hardware store or plumbing supply specialist, but make sure the new O-ring is an exact fit for your faucet. Also, it’s a good idea to coat the new O-ring with plumber’s grease before installing it.

If you have a leaky faucet with a ceramic disc, the most likely culprit is worn out neoprene seals that are located in the base of the ceramic-disk cylinder. To replace these seals, you’ll need to remove the handle, unscrew the escutcheon cap, and loosen the disk cylinder mounting screw with a blunt screwdriver. Then, you can remove the cylinder and sand the bottom of the ceramic disk with emery cloth to restore its smoothness and remove any dirt that has collected inside the cylinder openings.

Once the cylinder is removed, you can install the new seals and reassemble the faucet. When reassembling, be careful not to overtighten screws or nuts as this could damage or bend delicate parts of the assembly. Finally, turn on the water to test your work and make any necessary adjustments. If you’re still experiencing a leaky faucet after following these instructions, it may be time to call a plumber in San Diego.

Repairing a Faucet with a Cartridge

Cartridge-style faucets often have mineral deposits that clog the valve seat. When this happens, water no longer passes through the cartridge, and the faucet begins to leak. You can usually fix this by replacing the cartridge. The best way to do this is to take the old cartridge with you when buying a replacement, so that you can make sure it’s an exact match. It’s also a good idea to pick up some plumber’s grease for the new O-rings, as well as the brass screw on the top of the cartridge shaft if it has one (some don’t).

Before you begin, shut off the water supply. Then, remove the handle by unscrewing the screw on the back side of the handle. If there’s a bonnet nut holding the cartridge in place, remove it with a crescent wrench. Some cartridges have two tabs that fit into notches on the faucet body to hold them in place; if yours is one of these, use pliers to pull it straight up. You may need to twist the cartridge a bit as you do this to get it fully seated.

Once the cartridge is out, clean off any mineral deposits with distilled white vinegar and a scouring pad. Use a utility knife to cut off any old O-rings and coat the new ones with nontoxic, heat-proof plumber’s grease. You’ll likely have to replace the rubber washer that sits at the bottom of the cartridge, too.

You’ll also need to replace the cam washer and the retaining clip, which is sometimes made of stainless steel and has a keyway on its cap. If your faucet has double handles, check to see which one is leaking. If both are, it’s important to reinstall the cartridge in the same direction, so that the tabs on the cartridge line up with the corresponding notches on the faucet body.

To do this, use a screwdriver to remove the decorative caps on the handle, which will expose the screw that holds the handle in place. Then, loosen the screw with a screwdriver and tilt the handle back to remove it. You’ll need to replace the decorative cap once you’re finished with your repairs.

Repairing a Faucet with a Ball

You’ll be able to find parts for cartridge-type faucets at most hardware and home centers, but the parts you’ll need to repair a ball or ceramic-disk faucet will be more difficult to find. You may have to order them, or you can try to make your own parts from washers and O-rings purchased separately. Before you begin working, shut off the water supply to the faucet. Then, loosen the set screw on each handle with a wrench or screwdriver and remove the handle. This will expose the screw that holds the valve seat in place. If the screw is tight, use pliers to loosen it. You’ll also want to remove the decorative cap at the top of the handle, which should have an “H” for hot and a “C” for cold. This will reveal a screwhead underneath, which you can remove with a screwdriver.

Once the screw is removed, you can lift out the valve seat and replace it if necessary. The rubber seats and springs are usually easy to remove from the valve seat as well. If you can’t get them out, you can cut them free with a knife and then reassemble the faucet by inserting the new seats and springs. It is important to install the new spring with the narrow end down. Otherwise, it will push the seal out of place.

Lastly, you’ll need to replace the cam and packing to restore water flow to your faucet. You can do this by first loosening the cam nut, which is a cone-shaped piece below the handle. This can be done with a wrench or pliers, but you’ll need to remember the orientation of the nut and packing when reassembly occurs.

You can now replace the plastic cam, which should come with a new packing and a new gasket. Once you do this, you can replace the nut and cam washer with a wrench or pliers. You’ll need to remember the orientation of the washer and cam, as you will be reassembling them in reverse. Now, you can reinstall the handle and turn on the water to test for leaks.

Repairing a Faucet with a Ceramic Disc

Ceramic disc faucets have a very sleek and luxurious look that is very popular. However, like all faucets they do need maintenance and repair. The main problem with these type of faucets is mineral build up that causes them to leak or not work properly. This is usually a problem in areas that have hard water. The good news is that it is very easy to fix. Generally you can just remove the cartridge and give it a good rinse. In some cases, especially if there is a lot of sediment, you can soak the cartridge in a mixture of 50% water and vinegar for 30 minutes and then rinse it again. Once it is cleaned it will usually be fixed and you can just put the cartridge back in and turn on your water again.

First, you need to shut off the water supply to the faucet. You will need to locate the hot and cold shutoff valves that are connected to your water pipes under your sink and turn them off. The valves will often have knurled knobs that you can rotate clockwise to shut them off. Once the water is off you can start working on your faucet.

Next, you need to remove the handle from the faucet. There is a screw that holds the lever to the lever post and you will need to remove this screw with a screwdriver. Once you have removed the handle, pry off the decorative cap that covers the cartridge and loosen the set screw that holds it in place. Once the set screw is removed you can pull the cartridge out and inspect it for damage. The rubber seals in the cylinder might need to be replaced. If they are worn or damaged, you can use a nonmetallic scrubber to clean the cylinder openings and then replace the seals.

Once the seals are replaced, you can put the cartridge back in and turn on your faucet again. If you have a single-handle faucet, you can now install the new cam washer and replace the decorative cap. Make sure that you align the keyway on the cam cap with the tab on the faucet body so that the cartridge will stay in place.

Electrician

What Does a Residential Electrician Do?

Residential electricians specialize in installing and repairing electrical wiring and devices in residential homes. They may work for electrical contractors or on their own as independent contractors. The job is challenging and demanding, and it is essential to follow all safety procedures. Electricians often work nights and weekends to address emergencies in private residences.

ElectricianAs the name implies, residential electricians work on electrical systems in homes and other buildings. Electrician Fort Lauderdale are responsible for installing, troubleshooting, and maintaining these systems. They often work on low-voltage systems, such as doorbells, thermostats, landscape lighting, and other devices that operate at less than 100 volts. These devices require special knowledge and skill because they are more sensitive to voltage fluctuations and other influences than higher-voltage systems such as the wiring in a home or building.

In addition to working on new electrical systems in existing homes, some residential electricians are involved in constructing commercial and residential buildings. These projects typically involve planning the layout of electrical systems and ensuring that they follow all relevant codes and regulations. These electricians also frequently have to inspect and test wiring, equipment, and other fixtures to ensure that they are in good working order. Many of these electricians are also called on to assist with the installation of emergency power systems and backup generators in both new and older homes.

A good residential electrician is skilled in reading and interpreting technical diagrams. They must also be able to effectively communicate with their customers and clients. This is especially important if they are working in someone’s home, where they must be respectful and courteous of the people who live there.

Because they deal with a wide range of issues in people’s homes, residential electricians must be knowledgeable about many different types of technology. For example, if a homeowner wants to install a solar energy system, the electrician must know how to wire the system correctly and make sure it is compatible with the rest of the house’s electricity system.

Because of the variety of issues that can arise in a person’s home, residential electricians must be prepared to spend time on the road. This means they may have to travel to a number of different houses on any given day, or they may be required to stay at a single location for an entire day while installing a whole-house generator, for instance.

Education and Training Requirements

A residential electrician must complete on-the-job training through an apprenticeship program or attend a vocational school. Vocational and technical schools often offer two-year associate degrees in electrical technology. Some programs offer specializations like renewable energy or industrial electrical technology. Others focus on specific areas of the field, like residential wiring or home security.

Depending on the state, you may be required to pass a written and practical exam before becoming a licensed electrician. These exams are administered by the state’s licensing authority. You can prepare for the exam by taking an online certification course. However, online courses do not provide you with the hands-on experience you need to fulfill your state’s licensure requirements.

You must have excellent problem-solving skills to succeed in a career as a residential electrician. Most of your work involves troubleshooting and repairing existing electrical systems, so it’s important to understand how the system works. This includes understanding the wiring diagrams and knowing which tools to use for different tasks. It’s also important to understand the physics behind electricity so you can make informed decisions when installing new circuits and devices.

A residential electrician installs a wide variety of household technologies, including home security systems and air conditioning units. Many of these devices require high voltage and need to be installed correctly to avoid dangerous malfunctions. Other electrical installations include lighting and control systems, generators, and electric car charging stations.

In addition to having the necessary skills, a good residential electrician needs to have a strong work ethic and the ability to follow safety procedures. They must also be able to read and understand work orders, which are usually delivered via email or on paper. The ability to prioritize and organize is important, as are customer service skills. Finally, a residential electrician must be able to work independently and have good physical endurance.

A career as a residential electrician offers you the opportunity to earn an average salary of $41,500. If you are a skilled electrician, you can increase your earnings by seeking out more complex and challenging projects. This will help you gain more experience and improve your chances of getting hired by a reputable contractor.

Licensing Requirements

Residential electricians work in customer homes, which means they need to effectively communicate with customers and be respectful of private spaces while performing electrical work. They must also understand the local codes and regulations and know how to safely install or repair wiring. Licensing requirements vary from state to state, but most require several years of classroom instruction and hands-on work experience.

To become a licensed residential electrician, you must pass a written and practical exam. The exam covers the installation, repair or replacement of wiring and devices that distribute electricity. In addition to passing the exam, you must submit notarized documents proving that you have 7 years of practical work experience under a licensed journey electrician. In some states, education or training may substitute for part of the work experience requirement.

Electrical contractors must have general liability and workers’ compensation insurance. Residential electricians who work for themselves must carry personal property and professional liability insurance, as well.

Whether you’re working on a new house or an older home, you’ll need to be familiar with the National Electric Code (NEC). This is the standard that determines how and where wiring should be placed in houses and buildings. Its goal is to prevent fires and other accidents from occurring.

You’ll also need to know how to install and replace GFCIs, smoke detectors, receptacles and light switches. In older homes, you may encounter knob and tube (K&T) wiring, which needs to be replaced with up-to-date industry wiring. This requires the skills of a master electrician to ensure it’s done properly and meets current NEC standards.

The tools of the trade include wire strippers, cutters, crimpers and power drills. Some of these are specific to the job, such as those that are designed to cut through studs at right angles, or ones that can be used to install Romex in plastic boxes that are nailed to a stud. You’ll also need a wrench that can be used to tighten or loosen screws on fixtures and electrical devices.

Some states regulate licensing and permitting at the county or municipal level. For example, the City of New York requires electrical contractors to obtain permits before beginning any work on a job. You must also register your business with the local government and pay taxes.

Work Environment

Residential electricians typically work on wiring systems and electrical components like light fixtures, receptacles and outlets in homes or apartments. They may also install and repair specialized power systems, such as those used to run home automation equipment. In addition, these professionals might work on large-scale projects, such as installing electrical wiring in new commercial buildings. They might also be responsible for ensuring that the work they do meets all local and state regulations.

In order to decide whether to specialize as a residential or commercial electrician, it’s important to consider a number of factors, including career path options, the scope of work and interactions with clients. For example, a residential electrician will likely have less opportunity to advance within their field than a commercial electrician. Additionally, residential electricians may earn slightly lower salaries than their commercial counterparts.

Another thing to keep in mind is the type of work environment that you’d prefer to be in. For example, some people may prefer to work in a high-rise building or with a large number of customers and clients. On the other hand, other people may prefer to have a more hands-on role and interact with homeowners directly on a daily basis.

The work environment of a Residential Electrician is often different from that of a commercial electrician, but there are some similarities as well. Both specializations require extensive knowledge of electrical codes and systems. In addition, they both require a high degree of problem-solving skills and the ability to read blueprints.

Both commercial and residential electricians must also work with different types of wiring. Residential electricians often use non-metallic sheathed cable (NM) with a plastic sheath, while commercial electricians tend to work with metal tubing conduits that are designed for larger commercial spaces and power supplies.

Another difference between the two specializations is that residential electricians typically work with voltage systems between 120 and 240 volts, while commercial electricians can work with higher voltage systems. It’s important for these individuals to understand the differences in these voltage systems in order to ensure their safety and the safety of others.